Project 5 - Chicago Coin's Speedway Restoration
Temporary Insanity
06/2003

As you remember, if you tuned in last week, or whenever it was, my last
project ended with I would like an original Starwars machine though....
Well 3 years later I finally asked myself how long I was going to wait for
that starwars game I wanted. I decided the longer I waited, the fewer there
would be out there. I did some checking around and played with the idea
of getting a controller and putting it in a regular mame cab.
They are hard to find. It is possible to take
similar controllers from other games but I could not find any that were complete.
In my research, I found out about the Microsoft Sidewinder Dual Strike. It is no longer produced but
the system can be interfaced with a starwars controller and even substituted for
one easily on a regular cabinet. You can find some great instructions
and diagrams at 1uparcade.com (Formerly at http://www.1uparcade.com/project-swyoke.html).
Another great site the explains how to convert a real starwars controller
to work on a PC is HERE at arcadecontrols.com.
It seems the same controller is good on some shooter games that require precise
control like Terminator 2(not a true gun game). I ordered a dual strike controller
from someone on ebay for $10.00 and may use it for another cabinet in the future.
I did some testing with the controller and it seems to do OK for star wars. I can
see that if it's insides were in a true starwars controller it could be excellent.
Maneuvering with one hand was a bit awkward but it did have good control and
was much much easier than a joystick or mouse. I tried it with T2 but it
was not very good at all. I had better results with a mouse.
I suspect there
are other driving games that use similar controls that would also be good
for the Dual Strike. I guess I will put it in my arcade supplies box in case
I ever get a controller to hack. At one time there was someone offering
a TwistyGrip controller for StarWars blue print but the site has since disappeared.


I went to a local arcade warehouse in LA, which is a fun field trip in itself. There
were a bunch of cabinets I would have loved to have taken home but I simply
have no room for a battlezone, or computer space, or any of the other odd shaped cabinets. They
had 2 starwars games. one in very good condition and one in good condition.
They were way too expensive. I did talk the owner down quite a bit and it
was still almost double what I was hoping to pay but I was there, the cabinet
was there and I wanted it so we made a deal. As I figure it I only have to
play it 6000 times to break even.


(Cinematronics 1978) based around the
first ever videogame created in the 60's on PDP-1 mainframe computer
called Space Wars. The Computer Space game had also been the first ever
coin-op videogame when it was released as Computer Space in 1972
by Nutting Asscociates, although at that time it bombed as
it was too complex.The game was created and then sold to them
by Nolan Bushnell, who with his next game Pong, created Atari.
I could'nt afford this one. See more and a photo from Soylent Green with
the Computer Space on the CEDMagic history website


Pinball games and Space Wars

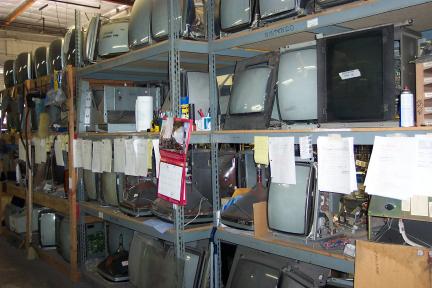
Some shots of the warehouse and the monitors in repair
While I was looking around the arcade warehouse and talking to the owner I explained
that I was looking for stuff he could not use that I may be able to. He offered
me a cabinet for $25, an original 1969 Chicago Coin's Speedway.
More of their EM games included the Motorcyclen which was similar to the Speedway at this listing of
Chicago Coin Games.
It was in terrible shape, water damaged sides, missing
back panel, real rough. I said sure, I'll take it. I cant pass up a $25 cabinet especially
when it is for an old game I never heard of. After I got this game home I started looking at it and
realized it is not a true video game. There is NO monitor! It is a true original
arcade game with mechanical graphics connected to a motor and the steering wheel
is physically connected to a little red car image that moves back and forth. The cabinet
is full of relays and rotating things.
I plugged it in to see if by some miracle it worked but alas, no. The car did not
move and the wheel did not spin, only the top half of the cabinet seemed to
work, there were no lights to project the image into the mirror.
It may be possible to fix so I have to decide if
I want to restore this game or rip it apart and make a new mame driver
cabinet. I hate to take it apart. This is one game that will never be emulated so
I will try hard to get it fixed before doing anything drastic. It looks like
remaking the painted graphics on the sides will be easy since they
were originally made using a spray paint template. I can make
a template from the one complete side and use it on both sides to make
two perfect copies after stripping off the bad wood. Once that is done
the cabinet will look 90% better.


My water damaged speedway game
After some experimenting I found that the top half of the game seemed to work
fine but the bottom half was dead. Totally dead. I thought this was strange.
Even if it had been water damged the lights and some of the deep motor parts
should still work. All of the mechanics seemed to move freely. I obtained a manual,
which I was suprised even existed at http://www.pbresource.com/
They not only had the manual but had both versions(there was a B version of this
cabinet) and some supplemental diagrams. The manual was really a schematic diagram with some notes. I
guess manuals were not as thick in the 60's. I made a photocopy of
the schematics to make notes on as I worked and also had it scanned
to a PDF. The manual set was $30 and the copies/scanning service was $40 (and remember I paid $25 for the cabinet).
It Begins......
I finally got tired of looking at this Speedway cabinet in my living room so over
a July 4th, 3 day weekend I decided by Monday I would have it finished.
I took some posterboard and made templates of one side(2 of them) I then
took tracing paper and glued it together in a big sheet to trace the
orange and black painted areas of the cabinet.
I was planning to strip the bad wood layer off the outside and
put a new veneer layer on it but once I pulled away the bad outter veneer
of the plywood the next layer was in such good condition that I hand sanded
it smooth, touched up bad spots with wood putty and painted it.
I then painted the cabinet and
as it was drying I made my templates by cutting out the patterns
for the orange and black parts of the graphics. It worked fairly well but
I had trouble keeping the posterboard tight against the sides. If I had
a better place to work I might have bought some 1/8" plywood and cut templates
out of that. I am sure that is how it was originally manufactured and it would
eleminate some overspray here and there. I did some touch up and you can
see from the picture how it turned out. Both sides totally restored.
There was a lot of touch up here and there, little fixes, cleaned bulb holders etc.
Tightened some springs that were not pulling hard enough and lubricating
everything with wd-40.
The 'crash' sound when the car crashes is actually a small microphone placed
near a metal sheet. When the car crashes a solenoid is triggered and slams
the metal sheet. The resulting sound can be heard through the front
speaker(this game has 4 transistors in it and all of
those are in the sound amplifier, no microprocessors, no memory chips).
The 'motor' sounds come from a fingered wheel on the road motor that
passes by a magnet but it does not seem to work yet. The amplifier does work
for the crash sounds quite well.
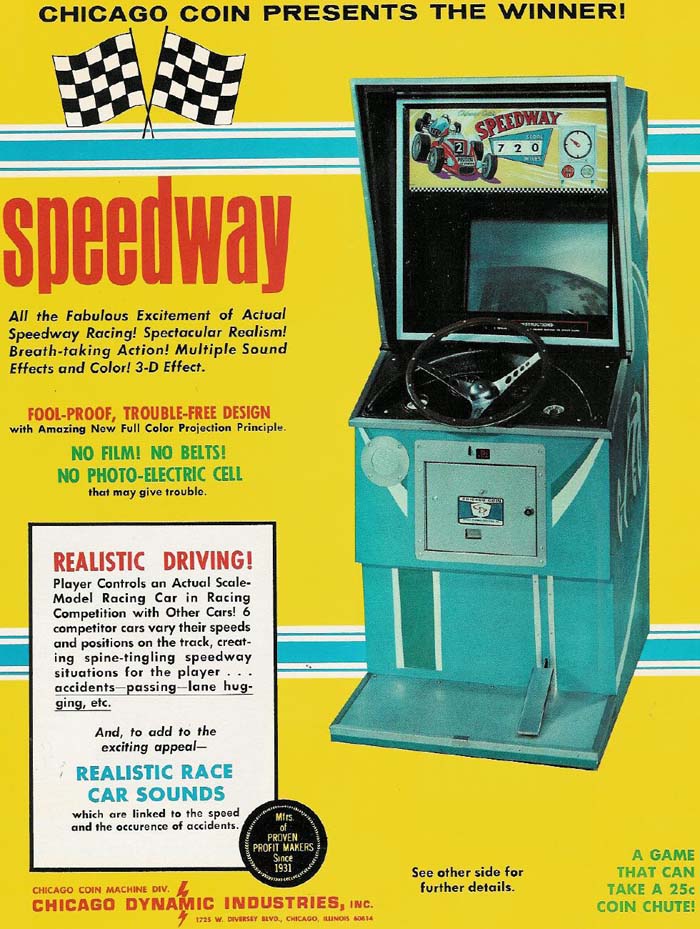
As I was working on this cabinet restoration I noticed some odd differences between
my cabinet and the brochure.
- My cab has a lightable "1" for 1000 scores, the brochure does not.
- My race car appeared to have been yellow which is what I restored it to, the
brochure shows red
- The stripes seem to be black over orange while my cabinet was orange over black
but it also appears the brochure may be an even lighter color of white or yellow.
- The racing stripe on the kickpanel on my model is under the silver accelerator
runners on the right, not on the left as in the brochure.
- My cabinet had a black frame for the glass, the brochure shows a silver liner?
- My cabinet has a full enclosure over the accelerator, the brochure
shows no enclosure and other pictures I have seen show only an open enclosure.
- My steering wheel was missing the horn button shown in the brochure
If you are looking for replacement bulbs see donsbulbs.com or
you can go to radio shack and get the smaller ones for pennies. The projector bulb
should be replacable by a 6volt car taillight type bulb(not a 12v it will not work) or
any similar hack of 32 candle power(MSCP:32) or you may find it easier to locate
a 6volt with 2 tips on the bottom, just file one down flat(preferably
the lower intensity one) and cover it up with something non conductive, then carefully solder a larger base in the center or
a small loop of wire to make contact in the projector socket. The 2 to 1 hack is
what I had to do. I tried a 12v single tip but it would not light up and only
the 2 tip types were available locally. I didnt really want to
mail order a 50 cent bulb and pay $20 to have it overnighted to me(I'm impatient). You
can find specs on the bulbs at dontsbulbs.com. All bulbs are actually powered by 6 volts AC.
Did you think force feedback was something new? This game from 1969 has a force feedback steering
wheel and it jumps with a loud rumble every time you have an accident.
The glass painting was falling apart. I had to be very careful with what was left to
keep it from flaking off. I touched up the largest places with model paint
and then sealed the flaking paint using large lamination sheets. Not the best method
but it will keep any more paint from flaking off. Hopefully it
will not be a problem with the incandescent lights behind it.
I did not want to alter the cabinet or wiring if it was not absolutely
necessary but I did need a coin button. I added a simple switch mounted
in contact with the coin return mechanism so anytime the coin return button
is pushed it is the same as a credit now and no holes were drilled.

This was the foot panel during restoration
I added the caster, I like for my cabinets to be mobile

This is the foot panel after. You can see a little
bad wood because it was so badly warped but if you are
not laying on the floor it looks fine.

During the Restoration

During the restoration, after painting
You can see my Empire Strikes Back in the background

After the restoration

Marquee

This picture is terrible but I could not get a
good shot of the screen. It is projected through
a translucent peice of plastic onto a mirror.
I got everything working except that I never could get the game to start
by pressing the credit button but if I rewire it to a 'slider bank' relay then
it will work normally(at least it appears to be normal to the user).
As I kept working I begain having flashes of the movie 'Christine' because
things that were not previously working started working. I would clean one
relay and something else would start working. The sound suddenly started working fine and it is pretty cool with the strange
whirr for engine noise. The closer to completion I got the more things
that started inexplicably working.
It turned out to be a bad connection in the wire from the sound generator to
the amplifier.
You can cheat at the game by inserting a peice of paper between the fingers
for the red car contacts, then you never have an accident.
Back to the starwars cabinet.....
The first thing I did after the starwars game was in my living room was
pull it open to see inside. It has the later Ampliphone type monitor which
is more reliable. There was no manual. It then occured to me
that maybe I should have asked for one. Well I do have a pdf version which
is now printing out. It did have the information sheet on the back panel. I
removed it and put laminate sheets over it to keep it in one piece. I had a choice
of 2 cabinets(although our deal was only for the good not the very good condition
one but I took the good one because it had the full original graphics on the front
panel. The very good unit was black in the same place).

My starwars game
I was deeply concerned that I had not spent enough money on this project
already so when I found out that there was a mod kit that allowed one to play
starwars and empire strikes back on the same starwars cabinet I had to get it, only
an extra $150 from the below link at multigame.com.
I also found a replacement marquee at http://www.fabfan.com/bezel.html but
they require you to email to find out shipping costs and they never
bothered to respond to my email request, I re-requested to the
2nd email address they listed and it bounced, so I had to find a 'backup' replacement
elsewhere.
More links of interest regarding starwars arcade systems:
Empire Strikes Back Artwork
http://www.multigame.com/ Play SW and Empire Strikes Back in the same orig Cabinet
gamearchive.com Another great starwars and vector resource
Vector Monitor Repair Info
Check This an oscilloscope image of the starwars screen
Memos from Lucas Films and misc notes on SW during development
Some cheats for starwars stolen from gamearchive.com
Cheats, Tricks and Bugs
In the tower scene, you can shoot fireballs that are hidden behind the towers. In the trench scene, you can shoot fireballs through the catwalks.
Moving the flight yoke far left and far right during the attract mode will switch between the instructions and the high score list.
In the trench you can "use the force" and get an extra 100,000 points by not shooting anything except the exhaust port. The text "USE THE FORCE" will be at the top of the screen until you shoot. The 100,000 is actually awarded just before you have to shoot the exhaust port, so it's possible to take out some of the gun turrets at the end, too. (The bonus is actually lower on the first two waves.)
If you shoot Darth Vader more than 30 times, you get 27 shields. It is said you can also get 255 shields, but this is rare.
Cheats, Tricks and Bugs for ESB:
TRICK: Flying between the legs of Imperial Walkers can yield a rather hefty bonus. 5000 points for the first time, 10000 more points for the second, 15000 additional points for the third, and so on. The best way to do this is to line up and fly through it from the side. After flying through, continue forward and the next walker will appear directly ahead.
TRICK: During the tie fighter sequence, if you shoot the ships before they leave the screen, you will stay focused on the Executor and have a very target-rich environment.
TRICK: The best way through the asteroid field is to aim for a far corner and stick with it unless you absolutely have to dodge an oncoming asteroid.
TRICK: It is not obvious, but when the high score list is displayed at any time, you can use the flight yoke to scroll up and down the list to see all of the top 25 players. Moving the flight yoke far left and far right will switch between the instructions and the high score list.
BUG: At the end of the asteroid field, the game says it is awarding points and a Jedi letter. However, the points are never added to the player's score.
BUG: If the player spells "JEDI" at the end of the tie-fighter sequence and dies during the asteroid field, the Jedi bonus timer will continue to run during the attract mode.
MISC: The high score list will reset if the Jedi-letter mode is changed on the game options screen.